Packages are made to give you the option to create a package of multiple appointments from the same or different services and give a discount to the total price to attract your customers more.
Please note:
- The Packages feature is a part of our Pro and Elite licenses and isn’t supported in the Starter and Standard licenses.
- At the moment, Events cannot be used with Packages, only Appointments (Services).
Creating your first package
To create your first package you will need to set up two things first:
- Create services that you will offer – packages are created from existing services, so you will not be able to create a package unless you’ve created at least one service.
- Create employees and connect them with services – our plugin needs at least one service and one employee created and connected so it can work properly, and the same goes for the packages as well.
Now when you are done with creating service and employee, we can start with creating the package.
To access the Packages page, open the Services page, and you will see the Packages tab. Click on it and your Packages page will be shown.

Click on the “+ Add Package” button and you will see new options for creating the package that will be separated into five tabs:
Package Details is the first tab that consists of several options:
- Picture – you can upload a picture that will be shown for your package on the front-end booking forms,
- Color – here you can choose a color of your package that will differentiate this package from other ones on the front-end booking form as well as on the back-end Packages page.
- Name – this is the only mandatory field on this tab because a package cannot exist without a name. Give your package a name that will be shown during the booking but also later on the Customer’s front-end panel and the admin’s backend. Besides the name, you will see the “Translate” option so you can translate the package name into multiple languages and use it on the multilingual website.
- Duration – here you can choose whether your package will have an unlimited or limited duration. You can choose to limit package duration for X number of days, weeks, or months, and you can also set a specific date as the date of expiration.
- Description – here you can set a description for your package that will be shown during the booking to give more details to your customers. Same as the name of the package, you can translate the description since it will be shown on your website if you plan to create a website in multiple languages.
- Limit package purchases per customer – By enabling this option, you can limit how many packages a customer can book within a specific time frame and period for this particular Package. For detailed instructions about this feature, please check out the Roles Settings.
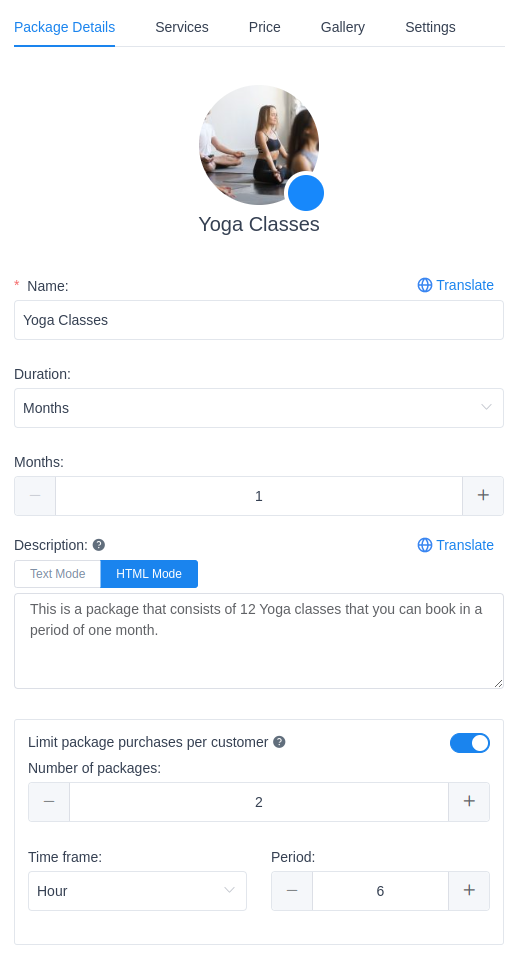
Example:
Limiting the customer bookings as shown in the screenshot above will allow a single customer to book 2 packages in a period of 6 hours.
The Services tab is the place where you will actually configure your package. In the dropdown, select service/s that you want to add to the package, and new options for those services will appear:
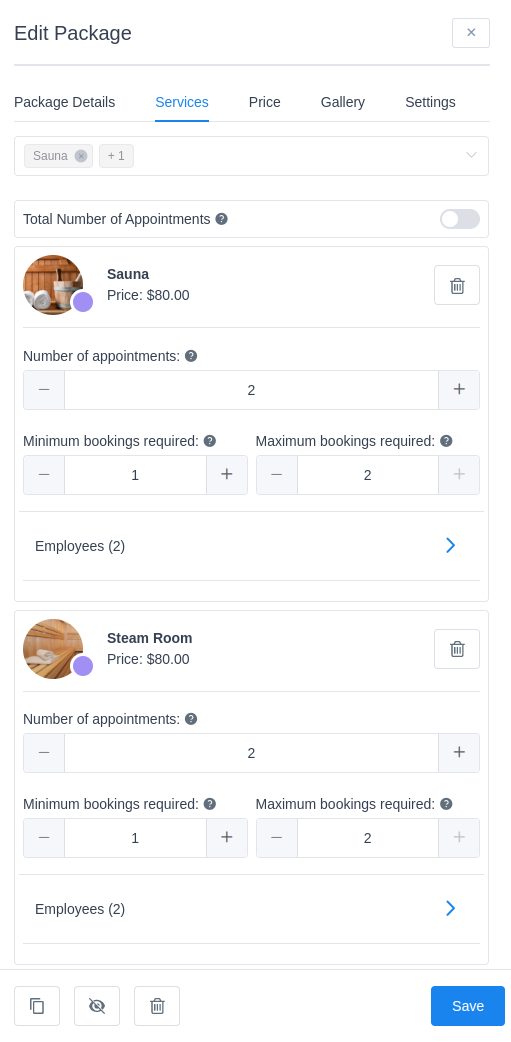
- If you add more than one service to a package, the “Total Number of Appointments” option will show up.
- If this option is disabled, you will be able to configure the total number of appointments per service. Example: Each service will have its own number of appointments (service 1 will provide 2 appointments within a package, service 2 will provide 3 appointments within a package, and so on).
- When enabled, you will configure the total number of appointments per package. Example: You will not be able to set the number of appointments per each service, but instead define the number of appointments within a package, so if you set it to 5 and you have 5 services in the package, your customers will be able to book 1 appointment for each service, or 5 appointments for one service, or 2 appointments for 1 service and 3 appointments for another service, and so on.
- The service picture, price, and name will be pulled from the Services page and those cannot be changed here.
- “Number of appointments” is the option that you can use to set the number of appointments that will be included in this package for the chosen service. For example, if you have a Yoga class and you want to create a package of 12 yoga classes that will last 30 days, you will choose just one service in the dropdown and choose 12 in the “Number of Appointments” option. You can, of course, choose multiple different services and set this number of appointments for each. Please note that this option is automatically disabled if you enable the “Total Number of Appointments” option.
- “Minimum bookings required” is the option where you set the required number of appointments for the chosen service that the customer needs to book in order to be able to book the package. You can set 0 if you don’t want to restrict customers and as a maximum number here you can set the number chosen in the “Number of appointments” option.
- “Maximum bookings required” is the option where you set the maximum number required for booking. It is added here to allow you to have one more option – to allow customers to purchase a package without any booking. This is possible if you set 0 as both, minimum and maximum required bookings, in that case after the customer chooses a package our plugin will automatically redirect the customer to the info and payment step, skipping the calendar.
- “Employees” – this option allows you to choose which employees assigned to the service will provide the service in the package. This gives you flexibility because if you use both services and packages you don’t need to have all employees assigned to the service assigned in the package as well. If you don’t check any employees, our plugin will connect the package with all employees assigned to the service.
- “Locations” – same as for the Employees option here you can choose locations that will be included in the package for a service. If you don’t check any location our plugin will connect the package with all locations assigned to the service.
Editing a package with the “Total Number of Appointments” turned off:
Editing a package with the “Total Number of Appointments” turned on:
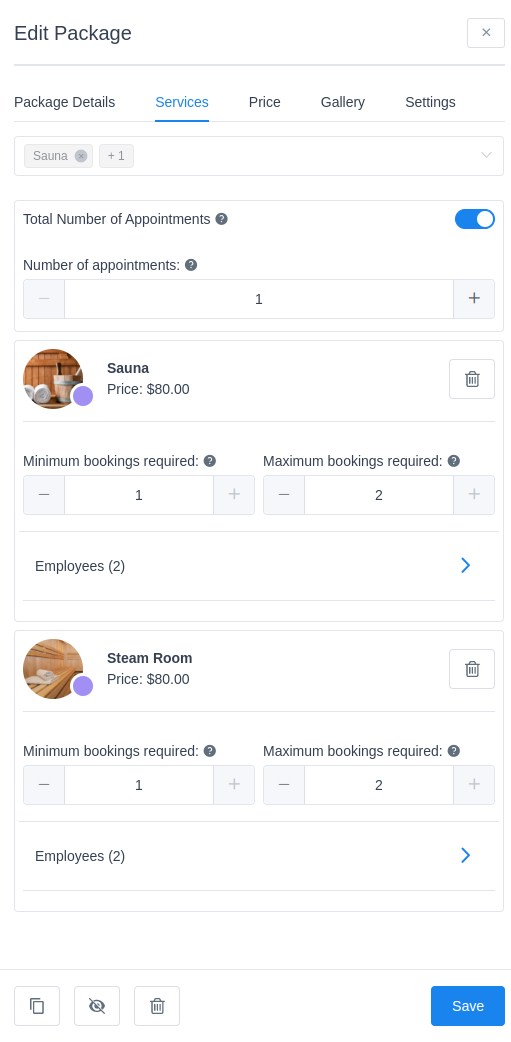
Please note: If you want to sell a package without any required booking in the Service tab for all selected services just set “Minimum booking required” and “Maximum booking required” to be both 0 and the customer will be able to purchase a package without choosing a date or time slot.
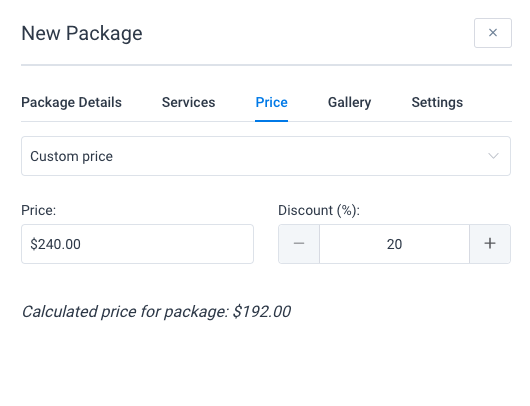
The price tab is very simple and you can use it to set the price for your package. You have two options here:
- Custom price – if you select this option that means you can set a custom price that will be different from the total calculated price of all appointments (services) that you added to the package. In “Price” you can simply enter the price for your package and in the “Discount” you can also set the discount that the package will have if you want to show it as a deal on the front-end booking form. If you set a discount, your customers will see this on the package to interest them to purchase a package of services rather than a single service.
- Calculated price – If you choose this option this will mean the price of the package will be calculated as the total price of all appointments and services added to the package.
Below the price, and if you enabled online payment methods, you will see the option “Enable deposit payments” so you can set up deposit payments for the package. More about this option you can read here.
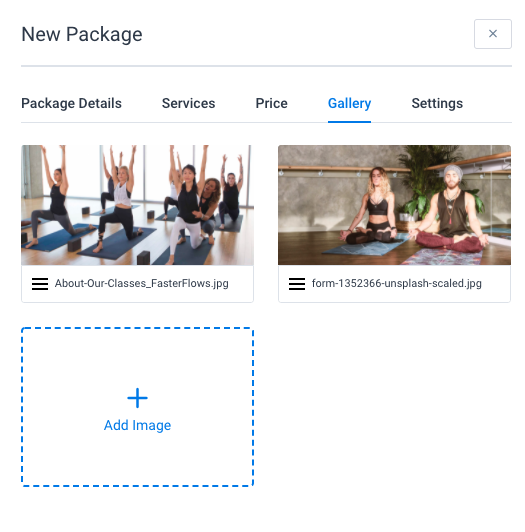
The Gallery tab is here so you can upload pictures for your package that will be shown if you use the Catalog booking form. Click on the + and upload a picture, and you will see it right away. If you upload multiple pictures you can use the burger icon and drag and drop pictures to reorder them – the order that you set here will be used for order on the Catalog booking form.
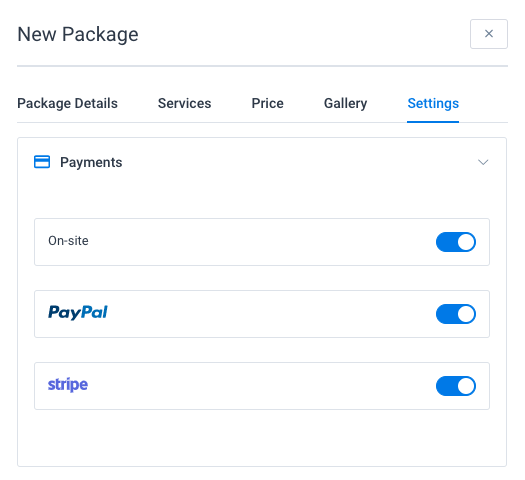
The Settings tab on the Packages is there so you can choose which payment method/s will be used for purchasing a package. You can choose one or multiple payment methods and if you want to use just WooCommerce checkout then first go to the Payments Settings on the Settings page and enable WooCommerce payment and you will see it here.
Once you finish with setting everything click “Save” to save your package and it will be shown on the packages page. On the packages page, you will be able to see each package with basic details: package name, ID, number of services included, and price. Besides this, you can drag and drop each package to set the order in which they will be shown on the booking forms or you can choose one of four options in the “Sort Packages” option: Name Ascending, Name Descending, Price Ascending, and Price Descending.
Things that you can do with packages:
- You can create a package of one service with multiple appointments in it and give a discount for purchasing a bundle that will be visible to the customers.
- You can create a package of several different services to attract customers to purchase some other services together with the most purchased service.
- You can give customers the option to purchase only a package without booking any appointments during the first purchase. They can book all services later from their customer’s panel.